A Lick of Paint

Hi guys,

Last week I was on the phone with a fellow who followed the blog and was interested in making his own container - during our chat I realised just how out-of-date some of the information on here is so time for a new post as promised!

Paint Job

First up the container is no longer a nasty shade of brown (RAL 3009 ‘Red Oxide’) but a nice bright white. As the original paint job is still very good I opted for a basic coat of self priming Dulux Metalshield (vivid white) for cosmetic purposes. After giving the container a good clean I had a bit of trouble thinning it (more like 1:1) but a 4L can more or less covers the area required (had an extra can sitting around too). I prefer the matte look although it scuffs and dirties a bit easier, glossy would of been a harder wearing choice (and it will chalk with time). I will eventually give it another coat once funds allow and the container is relocated off a dirt road.

Window Install

The windows have finally arrived and have been installed which was relatively painless - the glossy powder coat (Duralloy pearl white) compliment the matte exterior nicely. They were shipped with a range of matching trims and external flanges to facilitate different install options - in the end I decided to use clip on external flanges directly mounted and siliconed to the RHS frame. Aside from a few small leaks from 3 days straight of rain the container is finally weather-sealed after some 1.5 years sitting in the elements! See a picture below of the new paint job and windows:

Rear Cage

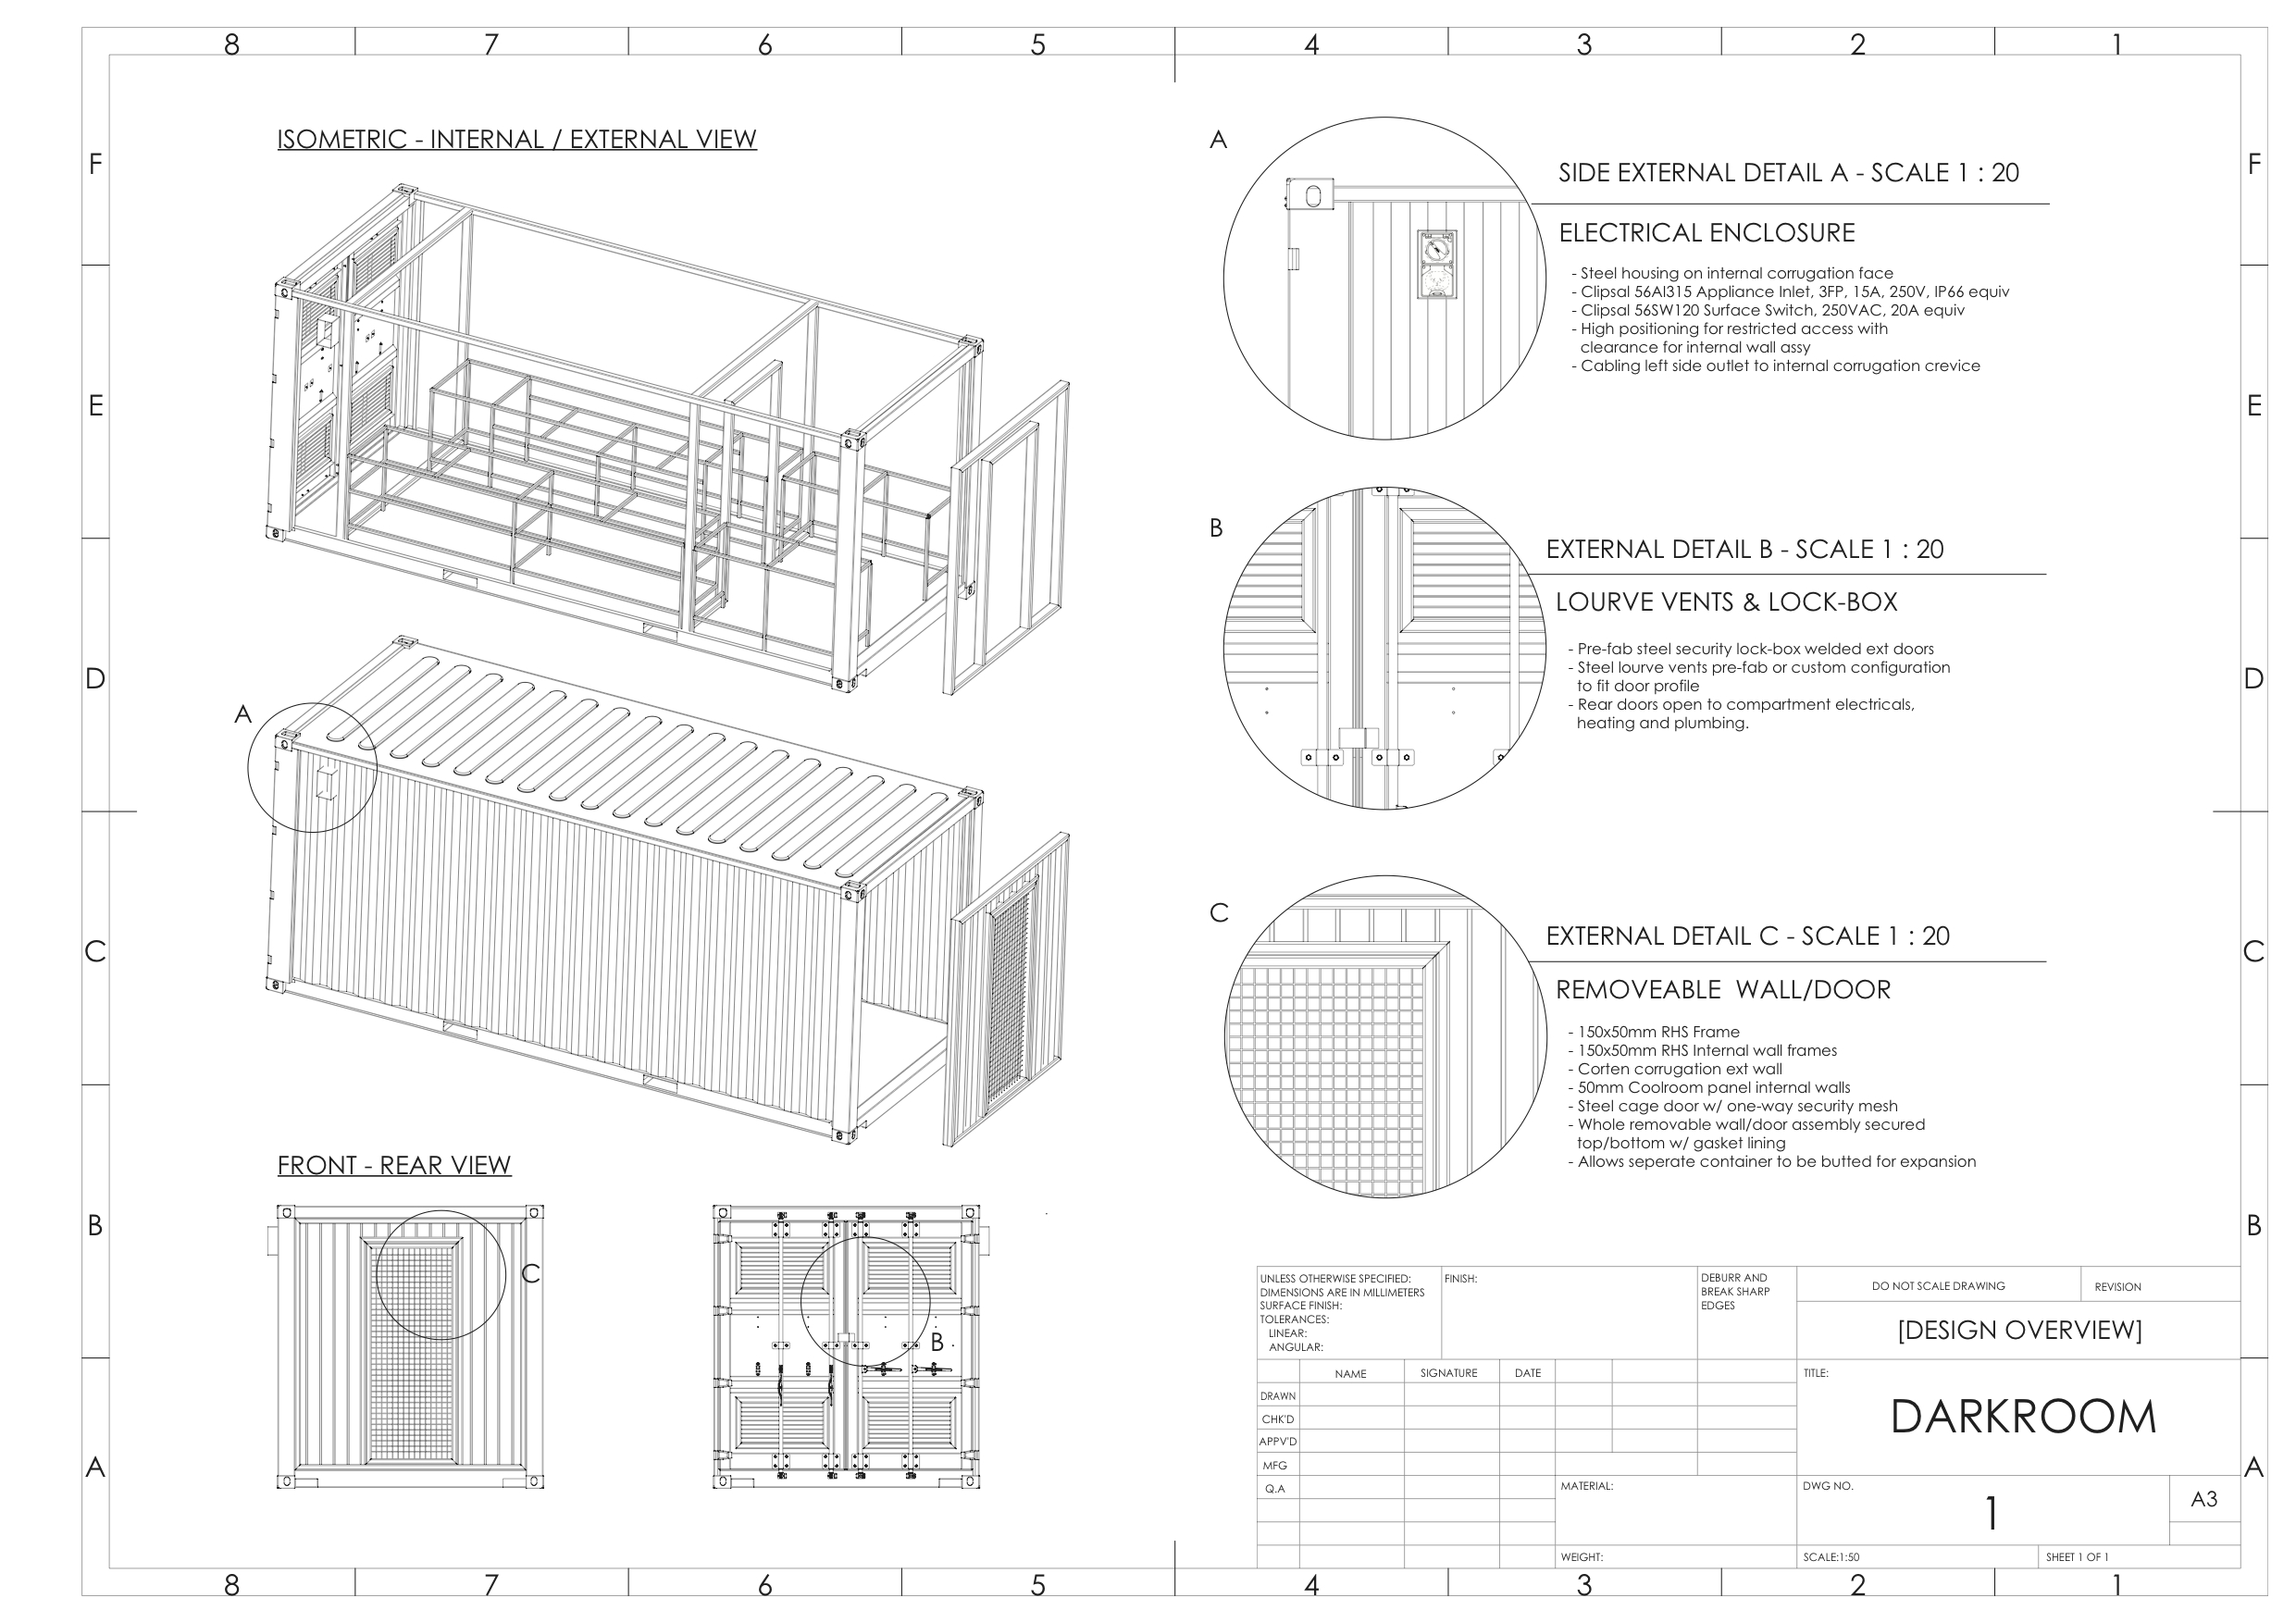
A recent design update I have been working on is a rear external cage/screen to house the power, solar, a/c and antennae units cleanly. It is of a fairly basic construction that has gone through several iterations and I have attached a drawing below. As always it is slightly out of date due to last minute design changes during fabrication (overall dims/ladder bars > louver). The design consists of a cage spanning the entire rear face with both insulated louver sidewalls and a perforated roller shutter for max ventilation, the cage is erected in 4 separate sections and fastened with universal container bridging clamps. It is assembled in such a way that all the pieces clamp together to support each other whilst closing off the studs to make it secure and tamper-proof.

This cage will now be incorporated across all the containers which will free up space and allow more design freedom. For the darkroom; all the plumbing, tank, power, heating and gas can be externalised (as opposed to partitioned off inside the container) allowing me to fit yet another enlarger :)

Health

Just a general update on my health situation; I am actually writing this on the way to what is hopefully the final appointment with my neurosurgeon. It has been 6 months since brain surgery, I got an MRI last week and hopefully nothing has grown back and all is good. In another 6 months I should be able to drive again after 2 or so years not being behind the wheel - I have taken up cycling as my main mode of transportation and hope to go bikepacking in the near future all good fun. Thats all for the moment, uni is still online and the internal walls/insulation are coming this month so stay tuned for the interior fit out…


Project Update

Hi All,

Sorry it has been almost a year from my last blog entry! I am happy to announce I have since undergone brain surgery with no complications and am now recovering at home. I have been quite busy the past year with studies but also some side projects and particularly the COVID-19 response at my workplace (a future post on that later).

Leading up to 2020 I had joined a local community darkroom (6x7PhotoHause) and had the pleasure of meeting some great people there including a very driven (and a little crazy) russian. From there I have been assisting him to establish a new D&P lab in the inner Sydney metropolitan area which finally opened in January 2020. You can find them just off Oxford Street in Darlinghurst, check their website below with all the services they offer:

Equipment Search
Whilst in Sydney I have been quite successful in locally acquiring various equipment needed for the container including some especially rare and hard to find stuff. I have compiled a short list below along with some individual posts on the big ticket items coming shortly. I still need to pick up a few other items within the next month or so depending on the pandemic status in Sydney.

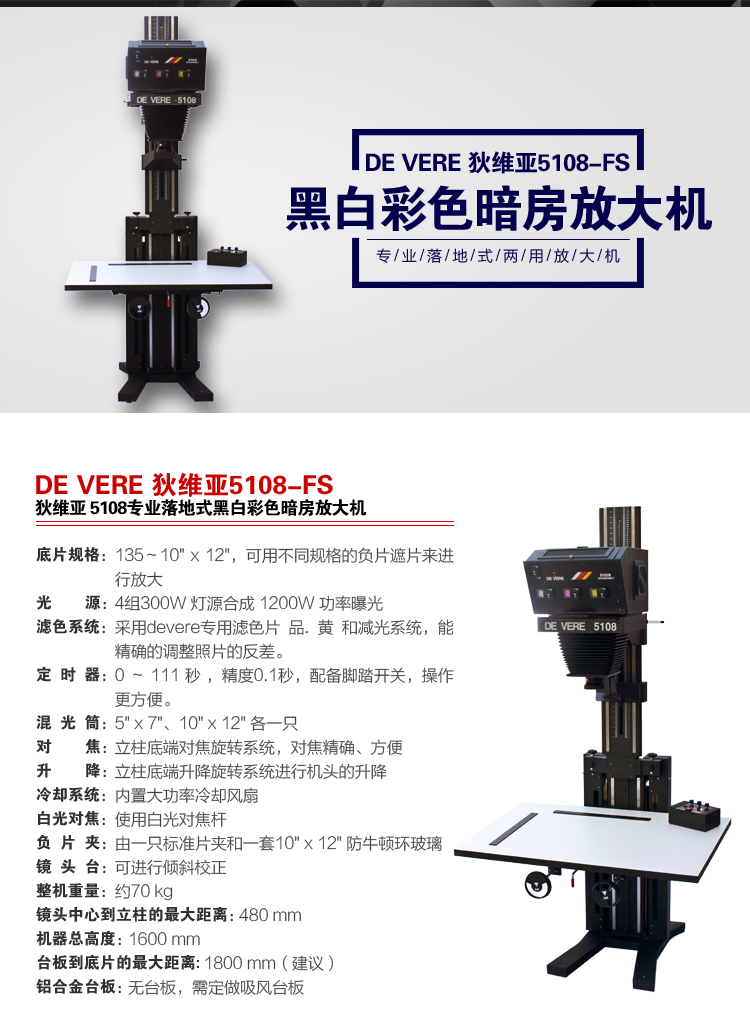
  • De Vere 5108 FS Model /w Dichroic head + RH Designs Analyser Pro Timer control

  • 2x Leitz Focomat V35 /w All head modules + Heiland Splitgrade head/timer control

  • 2x Phase One PowerPhase FX scanning backs

  • Versalab Parallel + Zig-Align ZP4 alignment systems

  • Toyo VX125RII (mfr. 2012)

  • Jobo ATL-3 Processor

Build Progress

Unfortunately, due to COVID-19 and surgery I have had to move back home to recover and stay safe. University has shifted to online only so I am still undertaking studies remotely however I am now able to continue work on the physical building of the container. Will be picking up where I left off with insulating the floor and installing the windows which will be ready in a month. I have attached an old drawing same moldings however a few adjustments have been made - the reveal is omitted and replaced by aluminium trim and external flanges. The window will now be glazed with 6mm Plexiglas XT (High Impact Modified) for increased security, next will be the internal insulation, walls, rear wall wiring and flooring. Stay tuned!

Collecting Lab Equipment

Gday readers, since I started this project I’ve had a rather unlucky run of health problems which has slowed progress unfortunately. I am due for brain surgery by the end of the year, the good news it is in an easy spot and there should be minimal complications with relatively fast recovery! Following this I have returned to Sydney to continue studies while I still can before the operation. In the mean time, whilst away from the container I have started looking for equipment for the lab. I am hoping being closer to metropolitan areas will allow be greater accessibility to larger equipment although I am still unable to drive for another 12 months.

That said, designing within the ~12sqm space limitations of a shipping container is challenging but enjoyable as a ID student. The way I have approached it is through careful equipment selection and placement - acquiring items first then building the rest of the container around it to ensure most effective use of space. I have already secured some big ticket items that have defined the sizing of the wet and dry benches and the general layout so far.

Both of these items came all the was from Brisbane! My budget is limited so no fancy custom made stainless fittings here (no need really for such a simple setup). If you check my first blog post you can see the basic layout of where these fit, I am still working on finalising a detailed drawing now that I have a better idea what what equipment will go in there. The next major items on the list to source is the enlargers of course! I am searching for a LPL 4x5 (7452/4550XLG or older variants) preferably with a VCCE or Dichroic head and a De Vere 8x10 (5108). I have chosen these based on their relatively compact sizes and flexibility. For the LPL I really only require the head/neg stage (will be building integrated motorised columns) and for the De Vere wall-mount version is preferable. I plan to have these alongside my medium format and 35mm enlargers and have posted WTB across forums I frequent.

Photrio Forum Want To Buy Thread

TB2K0ftkH0kpuFjy0FjXXcBbVXa_!!66350257.jpg

I understand these are quite rare and large items, but if you know of anything available please get in contact with me or comment below. I am also interested in a range of other darkroom equipment that I will list below:

  • Additional 4x5 and 8x10 Photographic Enlargers

  • Film Drying Cabinets / RC Paper processors or dryers

  • Film processing equipment both manual or automatic

  • Range of large format enlarging lenses from 80-300mm

  • 16x20, 20x24 or 30x40 inch easels and corresponding stainless developing trays

  • F/stop Enlarging Timers or other electronic timers

  • Alignment tools and/or spare parts for all of above

  • Any other relevant darkroom equipment

Any assistance is greatly appreciated! Speaking of equipment some time ago a obtained a great little upgraded Phototherm processor with a few tanks. It was in need of some minor repair work but luckily I am quite handy when it comes to that so if you have any ‘broken’ gear please let me know! Here is a short video of it all fixed up and running with 8-roll tank doing a water test, cycling pumps and heating solution all OK! (looking for a 4-roll tank to complete the set)

Hope you enjoyed the read and happy printing!

Container Landed!

g7gg7.jpeg

A long time coming…

It doesn't look like much but close to a years worth of work to get here! I am fortunate enough to have family with several vacant blocks of land to sit it on free of charge. This one was correctly zoned (shed <50sqm/acre) and was just down the road from my parents place. The block itself used to be a small farm but it is pretty bare now, just a few small trees, lots of dirt, weeds and catheads! There is no water or power just yet but most of the work can be done with hand-tools and a gennie. The local council regulations require any building or shed to be at least 10 metres from the curb and 5 from the boundaries therefore I have put it right on the very corner where there is a bit of shade and is furthest from neighbouring properties. Originally I wanted to put it on another corner under the cover of a very large old tree however two weeks before delivery there was a huge storm - the tree was struck by lighting and burnt to a crisp! This is a temporary spot whilst I build it and once it is ready it can be relocated somewhere nice with a bit of shade!

Prepping the property was a bit of work, a mate was able to clear the spot but I still needed to level it and figure out placement. At first I wasn't sure how I wanted to have it sit whether on a layer of gravel, on some kind of supports like railway sleepers etc. In the end I decided I wanted to have it off the ground enough to minimise erosion and maximise airflow, it will also allow me to work on the underside later on. About a foot of the ground is ample for what I wanted to do so I started searching for a suitable solution. Was considering stacking railway sleepers or using huge i beams until I found these precast blocks which were perfect, not sure what their intended use was but works for me although they weren't exactly cheap but I hope to re-use them. Once they were down I had to level them - first time trying to do this kind of thing, did not think it was worth to bother to hire a dumpy level. Despite the Riverina region being dead flat it was surprisingly out of level quite a bit and your eyes can be very deceiving. It wasn't until I got the string line out and over a couple days I had gotten it reasonably level with the help of my dad. I could of probably gotten it done a lot faster but there is a first time for everything - part of the reason I am doing such a project. The site was now ready to receive my baby.

The containers temporary new home!

It was delivered via tilt tray and dropped directly on the piers. The driver told us this was his first job with his fancy new remote controlled truck which was a bit nerve-wracking! But the whole process went unexpectedly smoothly, Dad and I made a bet that it would topple and we would require crane assistance. I think the last minute decision to fix the piers in place with star posts saved us here - they really did look like they were going to topple when backing up to land the rear end. Now that it is finally down I can get started with everything else; painting, floors, windows, electrical and internals - stay tuned!

Structural Mods Complete!

Back to the shipping container, most of the major structural modifications are now complete (off-site prior to delivery). Here are some photos (click to view full size)⤵

As you can see there have been some slight changes to the original drawings with added windows. The mods were done by RCS Albury as it was more convenient for them do so on their premise as my site is without power for the time being. They are a bit dearer that other vendors (eg in melb/syd) but the shipping killed any savings regardless. These guys weren't too far and were a smaller company so much easier to deal with, I was able to travel there and talk to the director what I needed and show him physical plans and drawings etc. They did a good job, pretty much all the spec from my drawings - they have done some pretty big and impressive jobs which you can see here:

https://www.ruralcontainers.com.au/latest-projects/

The container itself is a high-cube (initial design was GP) which allowed extra headroom so I could put windows in, they are hard to come by used out here so I was lucky. It is about 20 years old but in decent condition only a single ocean trip and was used as a removals container for Grace AU. All in all it hasn't had a hard life, with minimal surface rusting and no dents. The internals are slightly different (despite ISO) with added reinforcements and hooking to strap down any cargo, bit of a shame that I have to cover them up.

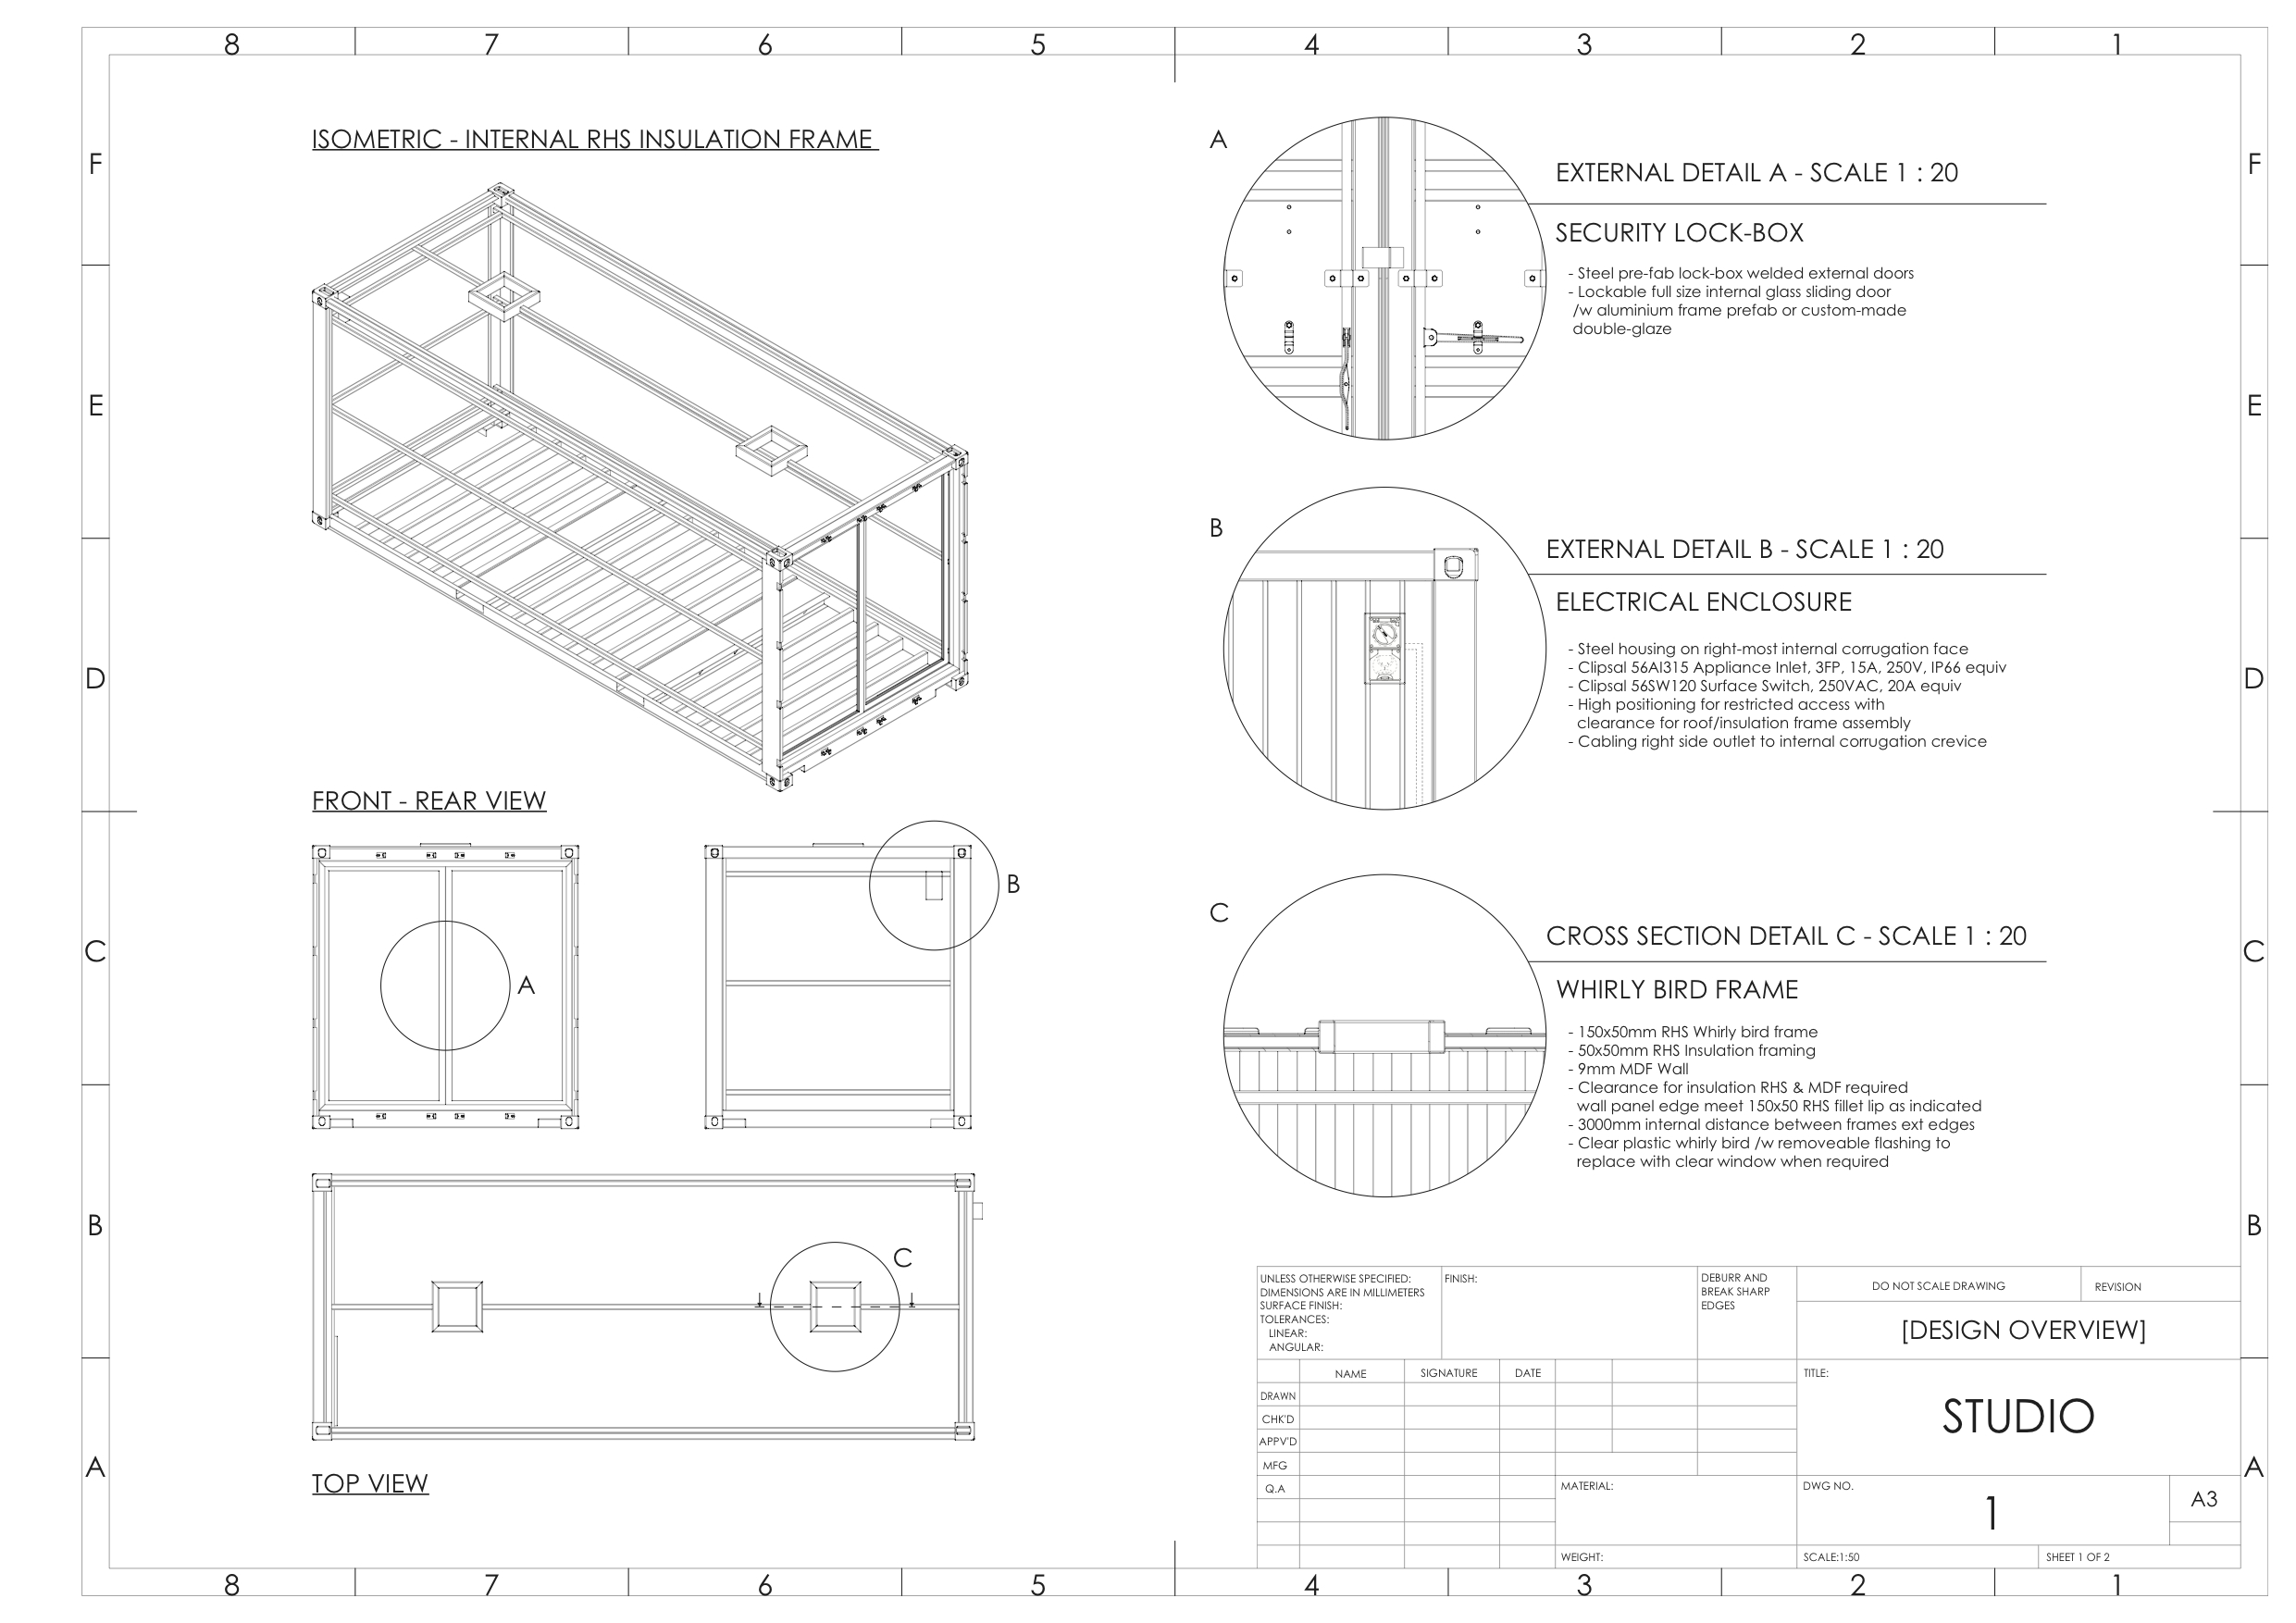
The square roof cutouts are for clear whirly birds which I have now installed - they will serve as a skylight and part of the ventilation system, they are removable for later ducting. To prevent the space from feeling too much like a dungeon I have also taken advantage of the extra headroom to install windows just to let some natural light in. I have kept them small as to not compromise security they will also be glazed with Plexiglas XT resist, in the rare case someone manages to get in (would have to destroy entire window before breaking plexi) it would be very difficult fit anything through them anyway (especially the more valuable larger stuff). The container cannot be opened from the inside either and there will be additional security systems in place (GPS/GSM alarm + cam). There will be a glass sliding door to fit inside the front doors but that will be last to go in once the container is populated for obvious reasons.

More to follow soon!

Cleaning out the Darkroom

Hi guys, aside from updates relating to the container I will post various everyday stories I would like to share as well. I will need to organise categories soon otherwise it will be all over the place so bear with me!

Just a small amount of what was recovered on my dining table

For a few years I was fortunate enough to work in a old photolab tucked away in a small regional town. My job mainly focused on the film and repair services, scanning, printing and upkeep/maintenance of equipment. They have just celebrated their 50th anniversary and I was surprised to find they still had a darkroom in the basement albeit decommissioned. Unfortunately the space had been relegated to storage for quite some time before I came along, it was a grand mess really. Boxes upon boxes and old equipment strewn everywhere - you could hardly walk around in there! With some careful persuasion and permission from the owner I tasked myself to start sorting, organising and cleaning out the entire darkroom.

During lunch breaks I would go down to that musty old basement, grab a box and slowly start sorting through its contents. It stunk of spent fixer and other nasties (I found a silver recovery unit still full of sludge! God knows how long that has been sitting there…) however I persisted. I started to find some really nice film cameras packed away in some of the boxes, perhaps old stock or uncollected repairs? In any case I got excited and turned into a bit of a treasure hunt! I even end up coming in on weekends and days off just to explore down there!

After several months or sorting I had amassed quite the collection of cameras. The bulk of it was mostly point and shoots, old folders (circa 60s) and rangefinders. Lots of Canon Ps, FTbs, petris and voigtlander vitos, himatics, olympus half frames just to name a few, most of them were uncollected repairs from over 20 years ago! There was a host of old elmo slide/8mm projectors/recorders, Polaroid land cameras and an assortment of lenses too some NIB. There were a few hidden gems and respectable point ‘n shoots amongst the lot most notably a 4x5 graflex rb reflex, a WWII recon camera and a BNIB, still sealed Hasselblad 500EL/M Lunar Anniversary Edition!!

Well, I hope you enjoyed this little adventure as much as I did. We end up selling most of the computer related stuff including C64s and various olivetties, DEC machines to a keen collector. The boss and I agreed I would slowly clean, repair and sell the remainder of the cameras in a new used section which I did until I returned to Sydney for studies. We sold quite a few for a small town in the middle of nowhere, a lot of backpackers and younger generations took a keen interest which is always nice to see. There is still quite a backlog of cameras as nobody else was able to continue refurbishing them in my absence so if you are curious about anything you see here drop a line and I may be able to arrange something for you!

Early days...

Around the 2014-2015 summer break I started dabbling around in a small darkroom I had made in my parents laundry - from there I was hooked! Unfortunately university was some 6 hours from home and I was living on campus with absolutely no room, I couldn’t take my darkroom with me. Or could I?

I am really not afraid of working in small spaces, perhaps due to my irish/italian stature so I got to work devising just how small I could make a functioning darkroom for prints up to 8x10 in size. Taking some inspiration from several small wet plate darkrooms made from black-out cloth or fishing tents the next logical choice was something not entirely legal. Enter the hydroponic grow tent, this idea has been chucked around the web but I never found anybody actually having done it yet. So I thought I’d have a crack at it…

The ‘spaceship’ Prototype 2015

These tents came in a range of sizes from dodgy eBay suppliers, I managed to score one for less than AUD 50. The size was 1msq by 2m tall ample enough room for me. Just to give some context I was living in a 6 share dorm with ‘shoebox’ quarters aprox 3x2m floor area, yeh, tiny. Now there was some dicussion on the net regarding the internal mylar lining and how to deal with all those reflections when printing. Some suggestions were draping extra fabric or painting which I thought was not ideal. After a bit of ingenuity the solution is quite simple really, invert it! It solves the door problem too (zippers now on inside - nobody can accidentally open it on you) and it also helps with the heat. I still wouldn’t use something like this outdoors in the sun though. A big factor was ventilation of fresh air, I had seen a few wet plate tents using “passive” vents - this is really not safe in such a confined space with chemicals. You can see I have simply mounted two fans to the duct inlets/outlets. You can get away with just one fan bringing fresh air in to create positive pressure it would probably be even better, but please get a fan and avoid suffocating yourself. Overall the whole thing takes about 30-45mins to set up.

Into the dark..

As you can see there is just enough room for single tray processing and a small 35mm enlarger (LPL 330D). Right next to the enlarger is a spot for the clone NOVA slot processing unit (another blog post). At the enlarger base is a small UV light box for alt process work. Drying rack under the counter and overhead hangers. No plumbing I would just bring a tray out to an external washer in the communal bathroom. That said it was quite comfortable and certainly beat having no darkroom at all although I designed it around a hybrid workflow using digital negatives, so sessions wouldn’t be longer that half an hour at a time. For traditional printing it is a bit of a squeeze.

All packed down and ready to transport!

My flatmates tolerated it rather they just kept asking for some of my stash! Luckily I worked for maintenance and was in charge of room inspections so not hitches there. As you can see it packs down to quite a respectable size, the tent bag, table bag and tub with the enlarger with all the tools, chemicals and paper. Ideally you would use this kind of set up as a portable, semi-permanent solution you could set up in a bedroom or such. After having transported it a few times back and forth the tent started to stress at the seems (flipping it put more strain around the frame). Just required some gaffer tape to block the pinholes on the edges but what can you expect for a chinese tent at that price! Some people have asked If you could travel with this tent in the bush and I’d say really isn’t robust enough for that kind of repeat set up/down action.

Hope you have enjoyed the read, you could say this was the initial seed that has grown into The Container Lab. There are many more posts to follow so please check back I will updating via instagram. If you have any questions or want know more details about this project don’t hesitate to leave a comment or contact me via email.

Happy printing!

Welcome!

Hi guys, welcome to the coblog! I have been working on this project for a long while now and would like to share my progress a little along with other everyday projects. I will be posting updates here and on Instagram if anybody would like to follow or learn more about it. Forgive me for my poor writing skills but thank you for sharing this journey with me!

Just a little bit about me I’m an IPD student who has had keen interest in art, photography, design and making. I’ve done a few exhibitions including my first solo in 2012 and have fallen in love the the analogue/hybrid process. Since university I have slowed down however have been very fortunate to accumulate some great equipment over the years for relative pennies! Unfortunately I haven’t had the chance to use it much whilst still studying and I am slowly running out of space back home..

Therefore this project came about the need for storage solution but also the ability to transport and use all my equipment when relocating. I researched several options from self-storage/sheds to commercial leases and portable site offices. For me, fixed assets offered less value for my currently-unknown-career-trajectory. Some of the large equipment does not travel well and needs a rather controlled environment. Portable site offices or prefab units started at 10K minimum and are difficult to move. The freight container was the next logical option at a quarter of the price and offered me the greatest flexibility regarding transport and modification.

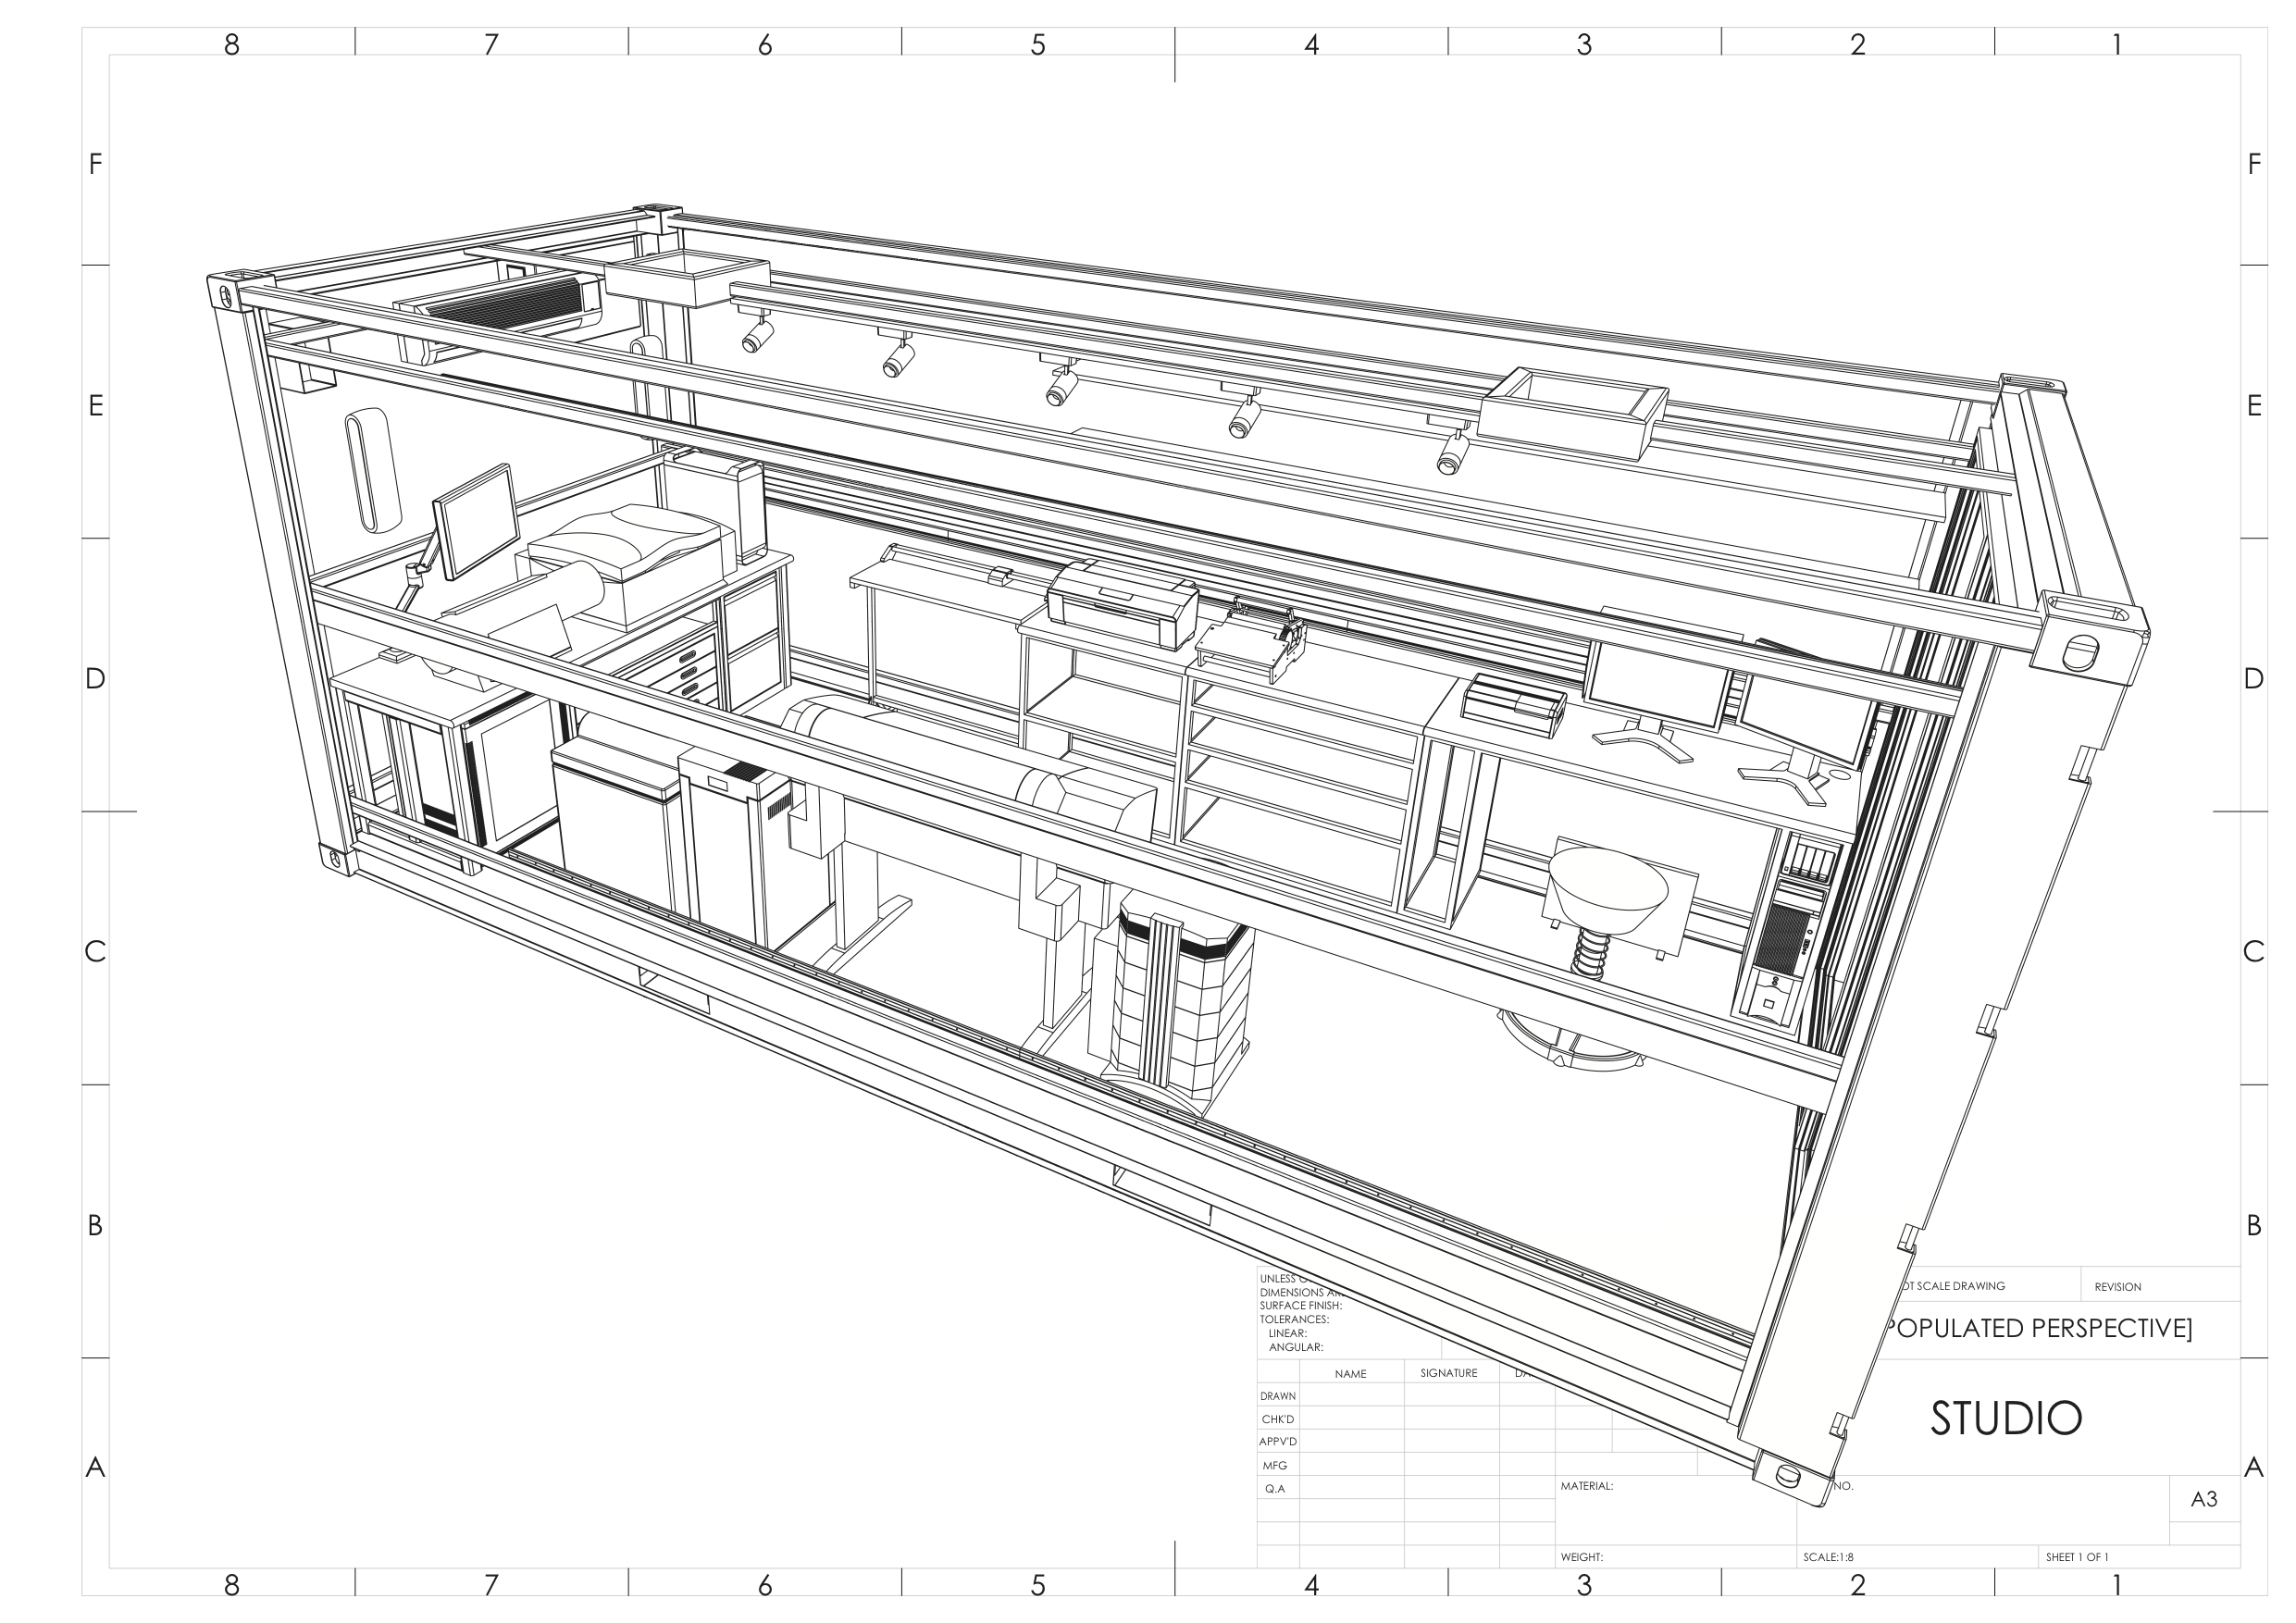
In my study breaks over the next few years, I started designing and modelling in CAD. Just late last year I finally secured a container and started realising my designs. Progress has been delayed due to ongoing health issues and study however I hope to get the studio done within the next year or so and start offering services. I have attached some early design drafts just to get an overall scope of the project and what is involved. The design drawings have since been modified slightly but please enjoy and feel free to comment.